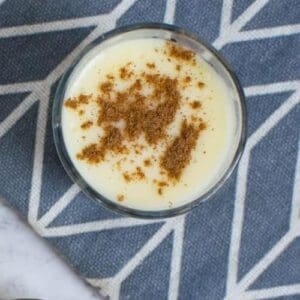
Do you want to try your hand at an old-fashioned vanilla custard recipe? If that’s you, you’ve landed at the right place!
This is my stovetop custard recipe that’s also easy to make.
If you follow the steps properly, you’ll find yourself making this easy dessert recipe time and time again.
Whether you make this vanilla custard for yourself or a dinner party, don’t let this recipe intimidate you. It really is worth it!
Also, a simple tip here: don’t overthink the recipe. It works. Just follow the steps.
What got me thinking about this recipe was a cruise that I went on a couple of years ago.
I had creme Brulee at dinner every night. Our waiter would bring it to me before the appetizer.
Yes, I started my meal with dessert. I’m an adult, and this is an advantage. Also, I only do it on vacation.
Well, MOSTLY!

WANT TO SAVE THIS?
- Whole milk: This requires the true whole milk variety. This recipe will not turn out right if you use 2% or low-fat milk.
- Vanilla extract: If you happen to have some vanilla bean paste, you can use that instead.
- Butter: Use the best butter that you have on hand. This is one of those moments when grass-fed butter would be amazing if you have it. Just the regular daily butter will work perfectly fine, too, so don’t stress over this.
- Eggs: Eggs are the star of the show, and if you have farm eggs, use them. I like to keep what I call ‘fancy eggs’ on hand when I can. This is the perfect time to use your “good eggs.”
- Sugar – Don’t get fancy here. Just use plain white table sugar.
- Cornstarch: This is a thickener, so it’s essential.

How to store custard
Yes, you can store homemade vanilla custard, and here’s how to do it. There are a few important steps to follow so that your custard recipe stays fresh.
Step 1: Allow the custard to cool.
All the custard to cool to room temperature. We don’t want to warm custard in the refrigerator.
Tip: Set a timer so that the custard doesn’t sit out for too long. You just want to allow the vanilla custard to room temperature.
Step 2: Transfer it to the proper container.
The container should not be very deep. You don’t want a lot of space between the top of the custard and the top of the container.
If you are serving the custard in individual containers, I recommend transferring the custard to those containers first.
Step 3: Cover with plastic wrap
Cover the custard with plastic wrap so that the plastic wrap is touching the custard.
This will keep air from getting to the top of the custard. If there’s an air gap between the plastic and the custard, a film will build up atop the custard.
Step 4: Place the custard in the refrigerator

How to serve custard
You serve custard warm or cold. I prefer my custard served cold, but the choice is ultimately yours. There’s no wrong way to eat custard.
Consider serving your vanilla custard recipe with a dash of cinnamon on top, and that’s it.
Another fantastic way to serve custard is with a few blueberries on top or even sliced strawberries.
Feel free to get creative with custard, and remember to appreciate the simplicity of the dish.
Don’t overcomplicate it.
Just enjoy!

Can you freeze custard?
All of the cooking pros will tell you that you shouldn’t freeze custard. Freezing custard will destroy its texture and consistency. When you defrost the custard, it will break.
This also means that it will separate, and it won’t be creamy any longer.
However, another blogger has discovered that you can actually freeze custard and bring it back to life.
Her process just takes a stovetop, a whisk, and a bit of patience. Check it out here.
WANT TO SAVE THIS?

Vanilla custard recipe
Ingredients
- 4 c whole milk
- 1 T vanilla extract
- 1 T butter
- 4 eggs
- 2/3 c sugar
- 3 T cornstarch
Instructions
- In a large bowl, whisk together eggs, sugar, and cornstarch until sugar dissolves. Set aside.
- Place a medium saucepan over medium heat.
- Add in milk, vanilla, and butter. Stir to combine.
- Bring mixture to a simmer.
- Remove the mixture from the heat.
- Stir in two tablespoons of the egg mixture from the bowl. Whisk it to make sure that it is thoroughly combined.
- Return the pan to the heat.
- Turn the heat too low. This mixture mustn’t begin to boil.
- Slowly pour in the egg mixture and whisk continuously until the mixture starts to thicken. Be sure to add the egg mixture slowly. If you do it too fast, it will turn into scrambled eggs. This may take around 15 minutes. The custard should coat the back of a spoon when it is ready.
- Pour the custard into dessert cups.
- Refrigerate for 4 hours.
- Sprinkle nutmeg and cinnamon on top before serving.
- Serve cold.
Nutrition
The bottom line
All of the cooking pros will tell you that you shouldn’t freeze custard. Freezing custard will destroy its texture and consistency. When you defrost the custard, it will break.
This also means that it will separate, and it won’t be creamy Indeed, nothing ever beats the good, old-fashioned kind when you’re trying to make your own vanilla custard recipe.
But in my version, you’d learn that there are many ways to elevate the experience – and all you have to do, really, is follow the steps religiously!


Thank you for sharing this recipe, it seems to be the exact one my mommom made when I was little.
Hi Danielle. I’m so glad to hear it! I hope it comes out perfectly for you.